Intro to methods for file sharing and making back ups
overGrive
File Sharing Across Multiple Systems with overGrive
When using multiple systems (laptop, many Raspberry Pis,etc) you’ll want to keep your programs sync’d and available on all systems. I’ve tried network mapping but found it slow. For a small cost Overgrive has been extremely useful for linking up my Google drive on multiple Linux/Rpi systems. I’ve used it for a few years now without issues. I also you github specifically for the code.
Overgrive - can be found in Software Store or you can download their .deb file and install using gdebi. (also install instructions on web site link) $ sudo gdebi <overgrive.deb file>
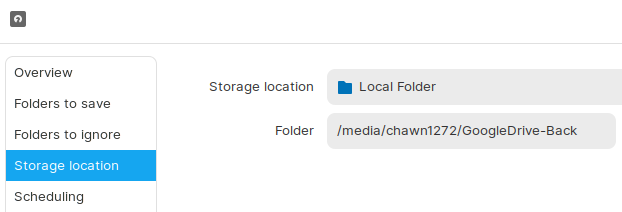
I started creating a separate, 15GB, partition for my GoogleDrive so I could monitor it with conky and keep it separate in my backup strategy.
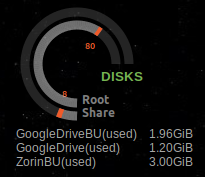
Once installed just follow setup instructions to link it to your Google account. On a Raspberry Pi 0/3A+ with only 512MB RAM the overgrive will slow it down (can use 100-150MB of RAM). I still install it and manually sync when starting up and then close it down to save memory. I also only sync folders with programs that I might use on the Raspberry Pi 0 (to save disk space and amount of time sync’ing)
Some other options I found myself using on a Raspberry Pi 0 booted to command line are also below.
- http.server (simple syntax, browser based, but only single files)
- rsync (fast, compresses)
- sftp (simple syntax)
- samba (includes sharing with windows)
samba
Allows file transfer with windows, too.
Setup/install the samba file server on the Raspberry Pi
$ sudo apt install samba samba-common-bin
Create a directory to share
$ mkdir -m 1777 /home/pi/share
Configure the samba server
$ sudo nano /etc/samba/smb.conf
[pi4share]
  comment = Pi4 share folder
  path = /home/pi/shared
  browseable = yes
  writeable = Yes
  only guest = no
  create mask = 0777
  directory mask = 0777
  public = yes
  guest ok = yes
Now create a samba login/password (you can use the same login info from your desktop)
$ sudo smbpasswd -a **user**
It will have instructions to create a password too
Then restart the samba service
$ sudo systemctl restart smbd
To login from another PC use the user and password you created.
Linux: smb://IPaddress or smb://hostname.local
Windows: \IPaddress
Note - login user/password info can be seen in seahorse
rsync
File copying tool
-a (archive and uses recursive for directories)
-v (verbose)
-z (compression)
-P (keep partials for resuming)
$ rsync [options] source destination
put/push (transfer from local to remote)
Include a backslash / at the end of the source to indicate copying contents, not the directory itself. Or omit the / and copy the directory itself.
$ rsync -avzP /home/user/dir/ pi@<IPaddress>:/home/pi/dir/
get/pull (transfer from remote to local)
$ rsync -avzP pi@<IPaddress>:/home/pi/dir/ /home/user/dir/
Can use ssh for secure xfer with “-e ssh”
$ rsync -avzPe ssh /home/user/dir/ pi@<IPaddress>:/home/pi/dir/
$ rsync -avzPe ssh pi@<IPaddress>:/home/pi/dir/ /home/user/dir/
$ rsync -avzhP /home/user/test/ pi@10.0.0.100:/home/pi/test/
\
pi@10.0.0.100's password:
sending incremental file list
./ PiMonitor.py 163 100% 0.00kB/s 0:00:00 (xfr#1, to-chk=8/10)
sent 1.86K bytes received 134 bytes 362.00 bytes/sec
total size is 2.29K speedup is 1.15
sftp
Quick, secure method with simple syntax, sftp, get, put.
On the local/source system, go to the directory with the files you want to share/copy
$ cd <folder>
Now connect to remote/destination system
$ sftp pi@hostname.local (or IP address)
enter login/pswd
Change to the destination directory
sftp> cd <folder>
Use 'put' to move files to remote
sftp> put <filename>
Uploading test.py to /home/pi/test.py
Use 'get' to get files from remote
sftp> get <filename>
Fetching /home/pi/test2.py to test2.py
http.server
Simple web server that allows you to browse folder/files and download a file. Can also serve static html files.
For my use case..
$ ssh pi@<hostname>.local(or use IP address)
$ cd <directory>
$ python3 -m http.server 8000
You can now go to <hostname>.local:8000 from any PC on your network and see your folder/files.
pi@raspberrypi:$ python3 -m http.server 8000
Serving HTTP on 0.0.0.0 port 8000 (http://0.0.0.0:8000/) ...
10.0.0.100 - - [14/Mar/2021 11:52:10] "GET / HTTP/1.1" 200 -
Directory Structure
Directory Tree Structure (/etc, /usr/bin, /var)
It is useful to get familiar with the folders on your system. This is a rough outline showing some of the hierarchy and purpose. Each system may vary some and all programs do not install their files in the same location, but there is a pattern. Also highlighted are common directories included in the variable $PATH (directories searched for the executable when you type a command) and good directories to backup. There can be more depending on your set up.
Software Package Executables (binaries)
$ echo $PATH
Checks on your system to see all locations an executable will be searched for.
bin and lib will be paired together. These are locations for installed programs, apps.
bin (executable binaries)
lib (shared libraries, modules)
Some common locations for the bin/lib pair (but not limited to these)
Executables required by your system (essential)
- /bin
Executables from Software Packages (non-essential)
- /usr/bin
- /usr/sbin
- /usr/local/bin
- $HOME/.local/bin (may use for personal apps)
Configuration Files Also includes the sources list detailing repository locations that software packages can be installed from.
System configurations
- /etc
- /etc/apt (Repositories/PPA)
Quick Description (linuxfoundation) / Root - All directories below start from here
/bin/ Essential command binaries (contains executables) PATH
/boot/ Static files of the boot loader, kernels
/dev/ Device files
/etc/ Configuration files (.conf) apps, host, repository BACKUP
/home/ Users home directories, files, settings BACKUP
/lib/ Essential shared libraries and kernel modules
/lost+found/ Used for recovery in case of file corruption
/media/ Mount point for drives (USB stick or internal partitions) while in GUI
/mnt/ Mount point for drives when “automount” after boot selected
/opt/ Add-on application software packages
/proc/ Virtual filesystem providing process and kernel information as files.
/root/ Root user’s home directory (config files for root account) BACKUP
/run/ Run-time variable data. Currently logged-in users and running daemons.
/sbin/ Essential system binaries PATH
/srv/ Data for services provided by this system (ftp, web servers)
/tmp/ Temporary files that are cleaned (good place to download installation file)
/usr/ Contains programs for user (/usr/bin, /usr/local, /usr/share) BACKUP
- /usr/local/bin PATH
- /usr/sbin PATH
- /usr/bin PATH
/var/ Variable data (files that change, web server, log files) BACKUP
Can use ‘tree’ command to get file structure and see the branches. Just go to the directory and run..
$ tree -L 1(1 layer down only)
$ tree -d -X -H baseHREF > test.html(directory only, output XML file)
Open the .html file in a browser and you can scroll thru the directories to get a feel where files are located.
More Detailed Description of Folders
/bin=Essential command binaries required by your system (executables)
bash, systemctl, cat, ls, cp, etc
/sbin=Essential system binaries. Similar to /bin. Meant to be ran by the administrator (super user)
fsck, init, route. ifconfig, reboot
/lib=Libraries essential for the binaries in /bin and /sbin (shared between programs)
/boot=kernel, boot loader, (grub)
config.txt –> HDMI display settings, overclocking, etc.
/dev=device files (hard drives)
/dev/disk0, /dev/sda1, /dev/tty, /dev/random, i2c, spi
/etc=System-wide configuration files (ie .conf)
gimp, lightdm, nano, hosts, hostname, conky, influx, grafana, fstab, mosquito (.conf files)
/opt=Optional application software packages.
A directory for installing unbundled packages (i.e. packages not part of the Operating System distribution, but provided by an independent source), each one in its own subdirectory.
minecraft, pigpio, wolfram, arduino
/home=Personal files/folders. Will have some configurations and shared files. Some applications can be stored here too (AppImage)
$HOME = /home/USER
$HOME/.local/bin (AppImage, Python)
$HOME/.local/lib (Python)
$HOME/.local/share
$HOME/.local/share/applications (.desktop)
$HOME/.local/share/icons (icons)
/usr=User programs (executables)
/usr/bin=Non-essential command binaries for all users. Many installed by the Linux distro.
scratch3, geany, gimp, argonone-config, blender, flatpak, code(VS), conky etc. LOTS OF FILES AND COMMANDS (whereis, whoami, etc)
/usr/lib=Libraries for the binaries in /usr/bin and /usr/sbin.
scratch3, geany, lightdm, conky
/usr/local=Legacy from the original BSD.
Similar to the /usr/ structure, e.g., bin, lib,. A place to install files built by using the make command (e.g., ./configure; make; make install). Help avoid clashes with files belonging to operating system.
/usr/local/lib
python3.7
/usr/sbin=Non-essential system binaries, e.g., daemons for various network services.
lightdm, i2cdetect, adduser, arp-scan
/usr/share=Contains shared data used by programs in /usr/bin
geany, gimp, blender, flatpak, code(VS), lightdm, nano, etc.
/usr/share/man
/usr/src=Source code, e.g., the kernel source code with its header files.
/var=variable files: files whose content is expected to continually change during normal operation of the system, such as logs, spool files, and temporary e-mail files.
/var/cache=Application cache data. Such data are locally generated as a result of time-consuming I/O or calculation. The application must be able to regenerate or restore the data. The cached files can be deleted without loss of data.
/var/lib= databases. State information. Persistent data modified by programs as they run, e.g., databases, packaging system metadata, etc.
/var/lock=Lock files. Files keeping track of resources currently in use.
/var/log=Log files. Various logs.
/var/opt=Variable data from add-on packages that are stored in /opt.
/var/tmp=Temporary files to be preserved between reboots.
/var/www/html=Apache web server
System Backup
Back up strategy varies based on your use-case. So it is a good idea to check out what works best for you and test it out before you actually need it. Below is what I have found works best for me.
My backup strategy is split into two parts.
- Aptik - Backs up installed packages, sources, configurations (and more)
- GoogleDrive/overGrive combined with Deja dup for personal files
I use Google Drive for personal files, and I found overGrive does a good job of sync’ing them to my hard drive in Linux. However, there was a small learning curve. Early on I tried re-organizing the folders by deleting and renaming directories and found folders were disappearing. Now I plan the layout ahead of time and avoid deleting or renaming folders. I also have a conky gauge showing the disk space on the desktop. If I see it drastically change I can investigate and worst-case revert to a recent backup.
Here are the steps I follow.
Either before or right after installing my OS I reserve free space for the backup partitions (If working in Linux I use Gnome-disk-utility)
- Dual boot systems are easier (windows and Linux distros). You can boot into Windows or another Linux distro, leaving the primary OS unmounted and “shrink” or “resize” the hard drive. This gives you free space to create separate backup partitions.
- Single or sole Linux OS install is a little more work since it’s harder to “resize” the primary drive. After installing the Linux distro I boot up ‘live’ from the USB stick and use “gnome-disks” to immediately shrink the primary disk and free up space.
- Raspberry Pi - Since the hard drive is a micro SD card you can easily use a USB adapter with another PC. Once I have “Free Space” I create these three Partitions
- Note - I use “gnome-disks” for creating partitions.
- 15GB partition for GoogleDrive that is sync’d with overGrive. This holds all my personal files.
- 45-90GB partition for Google Drive Backups.
- 10-20GB partition for Aptik. I make periodic backups (ie before an upgrade) of installed packages, sources, configurations
- I use deja dup to do daily backups of my GoogleDrive to the Google Drive Backup
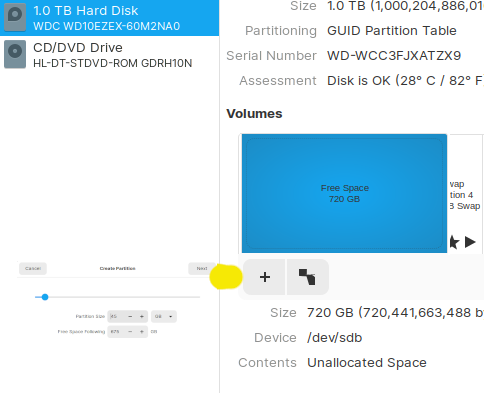
Partitions - Create and Automount Create a partition is done in “Gnome-disk”.
Select the “Free Space” and click on “+” to “Create partition in unallocated space”.
Enter the amount for the partition (ext4 type) and give it a label.
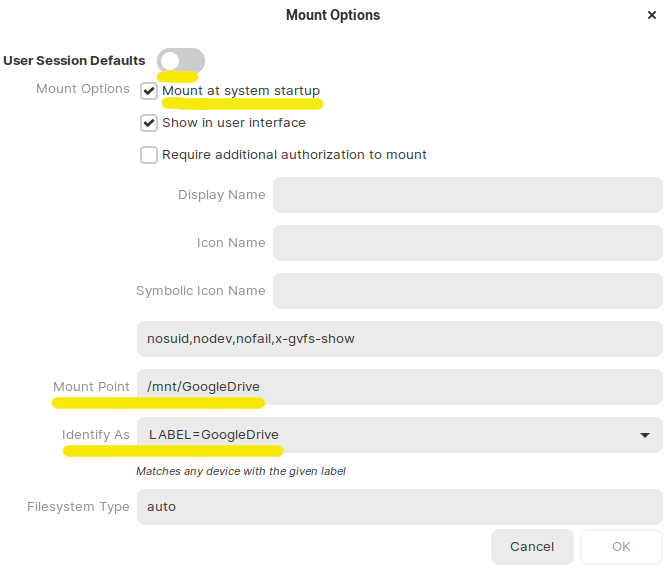
Automount Each time you boot will you need to open the file manager and click on the partition to have it mount. In order to have the partitions “auto-mount” open “Gnome-disks”, select the partition and “Additional Partition Options”, then “Edit Mount Options”. Click on the “User Session Defaults” slide. Enter your password.
- This is the GUI version of editing /etc/fstab
- You can select/deselect the “Mount at system startup” and see the “noauto” option alternate.
- Change “Identify as” to LABEL
Key difference in “auto mount” with the Trash bin for deleted files
- Auto-mount will use /mnt instead of /media. I found when I immediately turned a partition to “auto mount” my deleted files did not go to a “Trash bin” for later recovery. There are multiple solutions to this. This is what worked best for me..
- Create partition and mount (will be at /media)
- Create a test file and delete it (will create a hidden “.Trash-1000” folder)
- Now open “Gnome-disks” and change partition mount options to “Auto mount”
- Reboot and the partition should automatically mount and be at /mnt. It will also have a trash bin and let you recover deleted files
Aptik
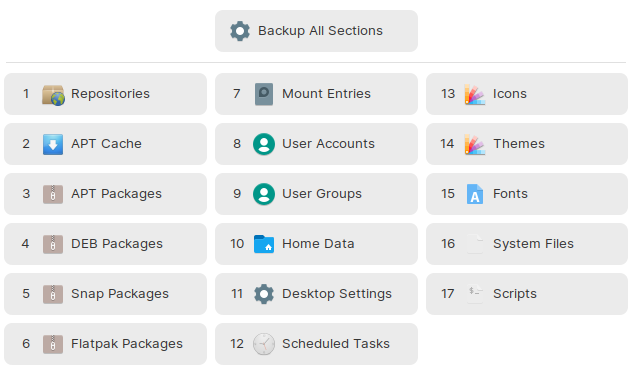
Aptik is the simplest part. You choose “Backup All Selections” and select the location. Since I do not use /home for my personal files (they’re in a separate partition with GoogleDrive) the backup is small and quick.
Deja dup with Google Drive and overGrive
I chose to do daily backups on personal files and keep them separate from other backups. overGrive is used to sync my Google Drive. Deja dup does a daily back up of this to the Google Drive backup partition.


Images can you col-# col-sm-# col-md-# col-lg-# Use auto to auto size around image Just wrap your images with <div class="col-sm"> and place them inside <div class="row"> (read more about the Bootstrap Grid system).