Intro to Linux
Linux Install Options
At the core of any computer is the Operating System (OS). The most common OS on PC’s is Microsoft Windows, Google Chrome OS, and Apple macOS with Linux a far fourth. But when it comes to learning data analysis tools and general STEM concepts the Linux setup is very useful. Linux is often used as a general term referring to the many Linux distros you can install (RPi OS, Ubuntu, Linux Mint, etc). Most Linux distros are free, have a great built-in coding/learning environment, and light-weight/efficient (ie they can run on newer or older systems with less CPU/RAM/Disk-space).
For clarification you do not install Linux OS, Linux is a kernel. Instead you install a Linux distribution or distro.
It’s helpful to understand early on what your options are for installing a Linux distro on a traditional PC/laptop.
- Install the Linux distro as the sole OS (ie you have an older Windows version on the PC that is not supported anymore or you’re using a Raspberry Pi type system that only has enough SD card space/processing power to run Linux)
- Dual boot. Install the Linux distro along side the other OS. When you boot the machine you decide which OS to start. The most common method I use because when you’re in the Linux distro you have all options/hardware available to you. Downside is both OS’s require a hard drive partition/space. When you want to use one vs the other you need to reboot.
- WSL (windows subsystem for Linux) This option is becoming more popular where you run Linux (ubuntu) inside your windows environment. No reboot is required to switch between windows and linux and it takes care of a lot of the Linux installation. Hardware resources are not as much an issue but you do not get all the Linux functionality (systemctl, vnc servers may not work the same). If you want to play with Linux but are not interested in Raspberry Pi/STEM projects WSL is probably the easiest option. (install in terminal with
wsl --installAfter install run asudo apt-get updateandsudo apt install python3-pipto make sure you have all the Python tools installed). Note - to get to your windows directories in wsl you’ll need tocd /mnt/c/Users/USERNAME/If you’re not using wsl and it is taking up too many memory resources can runwsl --shutdown - Virtual machine is similar to WSL, both windows and the Linux distro run simultaneously but it is a more full version of Linux at the expense of sharing hardware resources.
It is not a requirement to use Linux for projects. You can install Python on windows/mac or use an Anaconda distribution to do most projects. Github/git also have windows/mac installations. However my experience is that if you’re wanting to work with microcontrollers and databases that are collecting/storing data 24 hours a day then Linux will be helpful.
My setups look like this.
- Raspberry Pis are option 1 (Linux Raspberry Pi OS is sole operating system. On RPi0 I often boot straight to cli)
- Laptops/PCs are option 2 (Dual boot between Windows and Linux distros)
- For Windows I use option 3 + Anaconda. Anaconda has built in python, jupyter notebook, statistical tools and an easy to use environment system. I also install wsl and use VS Code remote to build projects in ubuntu. There were certain libraries I had a hard time finding in Anaconda and it was easiest to build in wsl/Ubuntu.
Note you use a USB stick to install the Linux distro and it gives you an option to try the system out before installing to your PC.
Although much of this site is geared towards STEM projects and Raspberry Pi I want to make a note on using a Linux distro for every day personal use. If you’re like me, and used Linux terminals in the 90’s, it’s important to know the Linux distros are nothing like that now. I have been using a few Linux distros for a number of years and they are the easy to install, efficient, and professional looking.
Most Linux distros are free with an option to donate and help support development.
Software Package Management
The first area of confusion for me was the software/package management system. The package manager is software you use to install/uninstall software on the computer.
APT/dpkg (FRONT-END/back-end)
- .deb
- Raspberry Pi OS, Ubuntu, Zorin, Pop!_OS, elementary OS, Linux Mint, MX Linux, Deepin.
- Ubuntu is Debian based, uses APT, and the most well known.
- Pop!_OS and Zorin follow Ubuntu release code names.
DNF-YUM/rpm (FRONT-END/back-end)
- .rpm
- Fedora, openSUSE
- RHEL/CentOS (RHEL=Red Hat Enterprise Linux)
- SLED/SLES (SUSE Linux Enterprise Desktop/Server) Pamac/pacman
- Arch/Manjaro use pacman for packages
Good article on history of package managers

Linux Distros
Below are some popular Linux distros but there are many more.
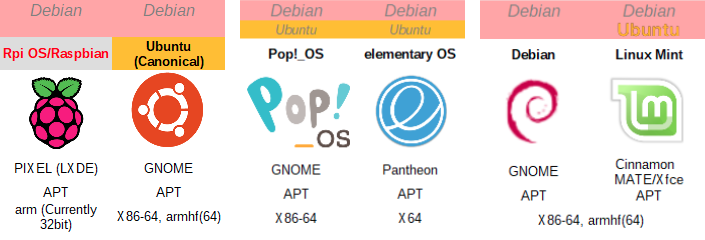
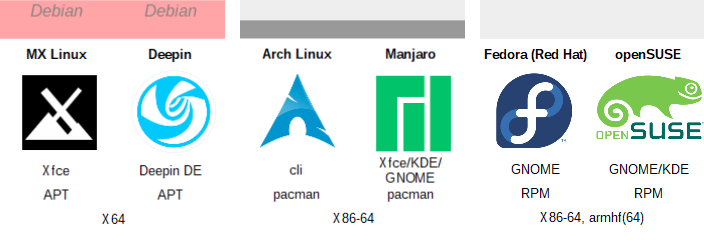
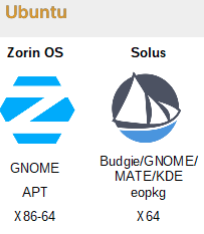
Notice many distros are Ubuntu based. Also listed is the desktop environment.
- RPIs use PIXEL which is not quite as polished looking but has less demand on system resources
- GNOME, Pantheon, Cinnamon, etc are all nice, professional looking environments However all of the systems can be customized even more in their appearance once you get it installed.
Most of them are free and you can use a Bootable USB stick or Virtual Box (virtual machine s/w) to take them for a test drive before committing to one.
Since I focus heavily on RPis which use apt/.deb I have stuck with Debian/Ubuntu systems. If you are new to Linux, and focused on STEM projects, it might be best to stick to Raspberry Pi OS until you get more comfortable. But it is still valuable to know the terminology used across different distros. Knowing the terms will make you more efficient at googling “how to .. “
Installing software in Linux was one of the more frustrating items for me to get used to coming from Windows. Depending on the software or package there are a variety of ways for installing. But you adjust over time.
Here are some scenarios that caught me early on
- You want to install a software pkg that is not in the built-in Software Store, you Google it, find a command to install it, run the command on your system and it comes back and says ‘unable to locate package’. (This could be caused by the software pkg not having a version for your specific architecture and/or OS release)
- You google various software that are not in the Software Store, and each have a different installation method. One uses apt, one is a .deb you download, one is a executable shell file, another is a tarball you unzip to corresponding folders. (You have to get used to installing packages via different methods)
- The same software can be installed multiple times on your PC using different package managers. This can result in different versions of the same S/W installed. A good example is gimp photo editor. You may already have gimp installed thru the apt package manager and not realize it. You then install a newer version of gimp with flatpak package manager. But when you start the application it is still using the older, apt installed, version. (It is the nature of Linux distros having multiple package managers. But once you learn the different options it quickly becomes a non-issue. Package section show how to catch this scenario and avoid it)
Some Quick Terms (more details in section below)
- OS is the operating system
- Desktop Environment (DE) is akin to windows; the graphical part you interact with a mouse.
- Conversely cli is a command line interface (terminal) using a keyboard.
- Package update method is how you install software, aka packages, in linux.
- Platform is what type of system or architecture.
Always look at resource requirements for each OS including reviews on compatibility with NVIDIA/AMD GPUs. I have both NVIDIA and AMD GPUs and OS’s like Ubuntu, Pop!_OS, Zorin, Linux Mint have worked fine.
There are 2 factors for 32/64bit. If you run $ lscpu most systems will list both CPU and Architecture Processor (cpu)
Intel/AMD
- 32 bit = X86 (or i386)
- 64 bit = X64 (or X86_64 or AMD64)
ARM wiki link has more details if you’re new to arm
- 32 bit = armhf (hard float, refers to armv7 architecture), armv7, armv6, arm11, and more
- 64 bit = arm64 (armv8+)
Architecture - Operating System
- 32 bit OS can run on both 32/64bit cpu
- but 64 bit OS can only run on 64bit cpu
Most OS’s focus on 64 bit (Raspberry Pi OS is still 32 bit to support older RPis that have 32bit only ARM) $ lscpu on a Raspberry Pi 3/4 with Raspberry Pi OS may tell you it is armv7, but it is armv8 and can have 64 bit OS installed.
Raspberry Pi OS Lite (No Desktop Environment Installed) is another option on RPis. It is a minimal install with no desktop environment. You can use it as-is with the cli or add a DE manually.
A Raspberry Pi being used in a project to interface with sensors or switches might be setup with RPi OS Lite and you login remotely to its terminal using ssh. If you do not need the desktop environment the RPi will be faster to boot/reboot.
More Details on Terminology
(don’t forget the command $ man <command> to see the manual)
Debian Family
- dpkg - Low-level/back-end tool for Debian-type distros. Install/removes .deb packages.
- APT - High-level/front-end tool, (command line) package manager for dpkg based distros.
- Synaptic- A GUI for the APT package manager.
SUSE/Fedora Family
- rpm - Package management system for .rpm files.
- YUM - Command line utility for handling packages with rpm based distros.
- DNF - Newer version of YUM, package manager for rpm based distros.
- RHEL - Red Hat Enterprise Linux
- SLED - SUSE Linux Enterprise Desktop
- SLES - SUSE Linux Enterprise Server
Kernel – The core of the OS and one of the first programs to load during boot. Interfaces between hardware and software, managing the CPU/Memory and connected devices. Linux is a unix-like kernel.
Early Unix Systems
UNIX-V - UNIX System V, early UNIX system. Some components, like init, still visible in Linux distros.
BSD - FreeBSD is a Unix-like OS descendent from BSD (Berkely Software Distribution). Slackware - oldest, maintained unix-like OS.
Raspberry Pi OS
I use Raspberry Pi OS on RPis0-3 and various OS’s on the RPi4. I also have other PCs with elementary OS, Zorin, Linux Mint. Most of the information is applicable across Debian/Ubuntu systems. Here’s some terms you’ll see when researching.
Debian is a Linux distro (distribution)
Raspberry Pi OS is a Linux distro, derived from Debian . It follows the Debian version code names (Stretch, Buster, etc). It is developed by Raspberry Pi Foundation. Default desktop environment is PIXEL (based on LXDE) and window manager is OpenBox. Used for my Raspberry Pi 0-4 (ARM) systems.
Ubuntu is a Linux distro and based on Debian. However it has its own releases and code names (Bionic, Focal, etc). It is developed by Canonical. I use Ubuntu with default desktop environment GNOME and window manager Mutter. LTS means long-term support and usually the preferred version.
Since Ubuntu and Raspberry Pi OS are Debian based many of the concepts are shared and makes it easy to learn both (along with other Debian/Ubuntu based distros). They do have different default desktop environments and icons and menus will be different. But you can change the DE and icons on a RPi for a completely different look.
One thing to note is that even though both are Debian based, not all software/packages on Ubuntu are available on Raspberry Pi OS and vice versa. Raspberry Pi OS has to support older RPi’s that are 32bit hardware. Also, since the Raspberry Pi is an ARM processor there will be some software/packages that may not exist or will not be the most recent version; compared to an Intel/AMD X86/X64 PC. If you are new to Linux it is wise to stick with the pre-installed Raspberry Pi OS software until you’re comfortable.
Some advantage of using Raspberry Pi OS on the RPis
- Optimized for RPi resources
- Pre installed S/W to take advantage of the GPIOs
- RealVNC for remote desktop installed (just has to be enabled)
Once you become comfortable, if you have a RPi4 (4+ GB of RAM) or laptop/PC with extra hard drive space, it can be a good learning experience to install Ubuntu and start testing out other Linux distros. Specifically for RPis with microSD for their hard drive. Ubuntu Desktop is included in the RPi imager. You can use a second microSD card and easily swap back and forth between RPi OS and Ubuntu.
Installing Linux Distros
Raspberry Pi OS on Pi0-4 has been simplified with the Raspberry Pi Imager. Follow the Raspberry Pi imager instructions.
For traditional PCs there are many options to install a Linux distro. Directions below have worked for me with Ubuntu, elementary OS, Zorin, Linux Mint. I generally use option 2 which is dual boot.
Directions will reference the Ubuntu install
- USB Ubuntu installer gives you an option during install to erase the entire disk and install the Linux distro as the sole OS.
- Dual Boot (see below) - Both Windows and a Linux distro exist on your system and you select one of them during boot. Resources are dedicated to the OS you choose so you can run it on an older PC. I have quick reference notes below.
- WSL (windows subsystem for Linux) Newer option that requires fewer resources and is easier to install compared to a virtual machine. WSL 2 requires Windows 10 or higher.
- Virtual Machine (ie VirtualBox) - You create a virtual environment within your OS (windows/macOS/Linux) that runs the Linux distro you’re testing out. Memory/CPU resources are shared so you need a decent system to run a Virtual Machine.
System Pre Check
After setting up Linux/Windows dual boot on multiple systems I’ve ran into a few items to be careful of before starting the install process or even setting up the Linux USB boot stick.
- Partition Style Check the partition style of the drive your windows system resides. Is it MBR or GPT? If you are adding disk drives for the Linux distro it is best to keep the partition styles the same and not mix-n-match. MBR (master boot record) is older and has limitations on number of partitions and size. GPT (GUID Partition Table) is newer without partition number restrictions. How to check partition style.
- Using Windows to check partition style - If you already have unallocated/free space on the drive (or you can create some free space for your linux distro) go to Disk Management (right click on PC file folder and select manage). Select the unallocated space partition and under properties/volume it will note the partition style. A second option is diskpart. Under run (window-R) type diskpart. A command line will appear and if you type “list disk” it will show if the drive is gpt. (if running the windows installation script you can get to diskpart command with “Shift F10”)
- If you have a disk drive you’re setting up and you want to make it gpt you can use diskpart. (be careful and make sure you’re using the disk you’re installing the Linux distro on)
$ list disk $ select disk # $ clean $ convert gpt * A Linux distro can be used to check partition style with gnome disk utility. It will show the drives and partition style. (note - GParted is another software tool that is also capable of partitioning but be careful with it. I have accidentally broken my windows boot loader with it.)
- What boot option is the BIOS on your PC using? CSM (Legacy) or UEFI. You will want your Linux USB boot stick to match the boot option of your PC. These are the firmware of your PC and stored on the motherboard. It is the first software ran on your PC when you power on. It will initialize hardware and load the boot loader (grub) on the hard disk which will fire up the operating system. (UEFI will search for the EFI boot file in the EFI system partition.)
Newer systems will use GPT/UEFI and is usually the preferred setup. But you may have to adjust according to what your PC is currently using.
Other things to research if running Linux dual boot with Windows
- Disabling the “fast start” option in “control panel” under “what power buttons do”
- Disabling the “secure boot” option in the BIOS
- I have a system with Intel RST (Rapid Storage Technology)/Optane memory that stopped Ubuntu from installing. I did not want to disable the RST/Optane memory in Windows so I tried elementary OS and Zorin. Both of these installed successfully with no issues.
Always look up the Linux distro’s installation instructions , especially if you have a NVIDIA/AMD GPU you want drivers for. But over-all the Linux distros I have tried have been easy and fast installs. I keep all personal files, along with a list of packages to install, on a google share drive. I then use overGrive to access them and setup my Linux PC.
Windows Prep
- For windows 8/10 disable the ‘fast start’ option in ‘control panel’ under ‘what power buttons do’ (optional, but you may miss the option to boot to the Linux distro)
- For windows 8/10 disable the ‘secure boot’ option in the BIOS (required)
- In Windows, manually create ‘free’ space on a hard drive for the Linux distro (optional - see below)
Why step 3 above is optional - There’s an option later during the USB Ubuntu installation to automatically “Install Ubuntu along side Windows 10”. It will let you select how much space you want to take from Windows to use for the Ubuntu install. The advantage is you do not need to do step 3 where you shrink/delete to make free space. The downside is that your root/home will be on the same partition.
My preference, is doing step 3, and using the “something else” option, where you specify partitions and memory amount for root, home, and swap individually. The advantage is cleaner upgrades and easier tracking of space used by software packages vs personal files. I’ve done both options though, and they both work fine.
- On your windows machine, go to file explorer and right click on ‘This PC’ and select ‘manage’ to get to the disk management tools (or type ‘disk manage’ in the Start menu)
- There are a couple ways to free up space on your hard drive for the Linux distro
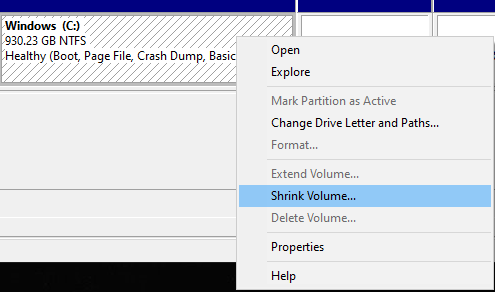
- Right click on one of your larger partitions and ‘Shrink Volume’ by 70+GB to make free space. This will end up with the Linux distro installed on the same hard drive as your Windows OS (which is not a problem, and probably mandatory on a laptop)
- An alternative to installing on same hard drive is putting an old, spare hard drive in your system and ‘delete’ un-used partitions to free up space. Leave the space as ‘free’. (this is the option I use on my desktop PCs) Take note of the size of the drives and partitions. This will give you confidence later when selecting the ‘free’ space that you’re not choosing the wrong partition.
After ‘shrinking’ a Windows partition (or deleting an un-used partition) you should have ‘Unallocated’ or ‘free’ space to use for the Linux distro.

Prepare Linux USB Boot Stick
- Download the Ubuntu version or other Linux Distro to install
- Confirm the iso matches your system architecture
- Follow the Linux distro instructions (ie checksum)
- Create a USB installer with Linux distro (need a USB stick) - rufus (for windows) or balena etcher (Windows/Linux) are good options.
- With USB stick plugged in, reboot from USB. Each system is different, and typically it indicates during boot what key you need to change the boot order.
- Often you hit F10 or F11 or F12 or Del during boot to change boot order in the BIOS or get to a Boot menu and select to boot from the USB drive.
- I’ve had problems getting a couple PCs to boot from USB and had to unplug the Windows hard drive to force it to boot from USB.
Dual Boot
Install the Linux distro using the USB stick.
- After your PC boots from USB stick you can run the Linux distro without installing it to test it out. When you’re ready select “Install” and start following the setup steps.
- At “Installation Type” select “Install Ubuntu alongside Windows 10” if you want root and home to be on same partition and skip to step 7 below. Selecting “Something Else” will allow you to create a root/home/swap partition individually.
- Find the “free space” that you freed up in Windows previously.
- Select the “free space” and then “+” (creating root partition)
- For size enter 30GB or more (type = logical; location=beginning of this space; use as=Ext4 journaling file system)
- Mount point is “/” (root. Root of the file system and is required to boot)
- Along with apt, you’ll likely use snap and flatpak package manager. These take up more hard drive space so I’ve moved towards 30+GB for root.
- Now use same method to create “swap”. Make sure “free space” selected
- For size, some set it equal to DRAM on the PC (ie 8GB, 16GB)
- Use as “swap area” (This is virtual memory. When the system runs out of RAM or needs to hibernate it will use this.)
- Now use same method to create “home”. Make sure “free space” selected
- Size can be the remaining free space or however much you need for personal files (30+GB)
- Mount point is “/home/”
- Install Now
- Follow the setup instructions


At this point you should have your Linux distro installed. If doing dual boot it is a good idea to boot into Windows and back to Linux to confirm the bootloader selection.
If you have multiple hard drives you may have to go back into the BIOS and select the priority for the HD boot. There should be an option in the BIOS to select which hard drive boot loader has priority.
If Windows is not in the grub boot options go into a terminal and type
$ sudo update-grub
After install if your notice your clock is out of sync between windows and Linux distro run the following command in the Linux distro
$ timedatectl set-local-rtc 1 --adjust-system-clock
$ timedatectl and check for RTC in local TZ: yes
GRUB
GRUB is the bootloader that lets you pick which system to boot into when you start your PC (and also sets the default OS to boot into after 10 sec). To change the default OS your computers boots to you have two options.
- Install the gui GRUB-customizer (I prefer this method) - grub-customizer makes it easy to add a background image for a better boot look
- Update GRUB config file with command line and text editor
Option 1 - (gui) grub customizer
# Add the PPA
$ sudo add-apt-repository ppa:danielrichter2007/grub-customizer
# Update the sources index
$ sudo apt update
# Install the app
$ sudo apt install grub-customizer
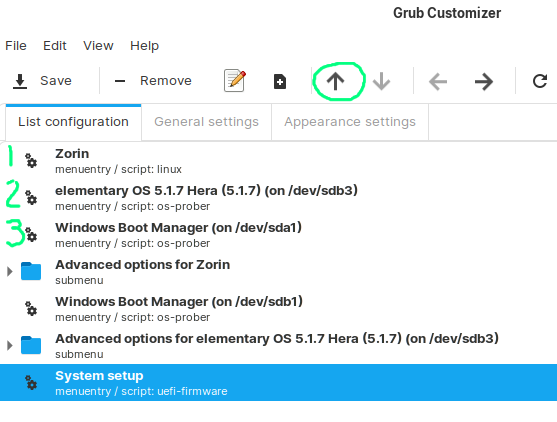
- Start grub-customizer with icon that was created
- Pick the OS you want to boot into by default and move it to the top using the UP arrow. (You want to select the one that is not in a folder.)
- Go to Appearance settings to upload a background image
- Then Save
Option 2 - text editor
# Edit the grub config file
$ sudo nano -B /etc/default/grub
# -B will create a backup with ~ extension in case you save a mistake
GRUB_DEFAULT = 1
# Enter the number corresponding to the order when you boot your system. May have to do a little trial-and-error if you don't remember the order.

# To boot into the last used OS
GRUB_DEFAULT=saved
GRUB_SAVEDEFAULT=true

# To change background image
GRUB_BACKGROUND="/home/USER/background.png"

# After changes run update
$ sudo update-grub
More Useful Terms
- Operating System (OS) - System software that manages computer hardware and software resources.
- Kernel – The core of the OS and one of the first programs to load during boot. Interfaces between hardware and software, managing the CPU/Memory and connected devices. Linux is a unix-like kernel.
- Packages - Files, libraries used by applications.
- Shell - Application used to interface with the OS. You type in commands and they’re sent to the OS.
- Desktop Environment (DE) - Also referred as graphical interface. The part you interact with. Fully integrated system that builds upon the Window Manager. Requires a Display Server and Window Manager. A system can have multiple DEs and you can use a Display Manager to select which one you want to use during login.
- Window Manager (WM) - System software, usually part of the DE, that manages the placement and appearance/menu/buttons of the windows. Can be used with DE or stand alone (requires X windows but not a DE)
- Display Server - (aka graphical server) Common example is Xorg. Provides the primitive framework for the DE. Uses display server protocol like X windows (aka X11, X, Xserver) or Wayland. Required for a DE.
- Gtk - Open source widget toolkit for making GUIs. (used in Wayland and X11) Gnome.
- Qt (cute) - Open source widget toolkit for making GUIs and cross-platform apps. KDE
- Process - A running program with either a running, sleeping, or zombie state